LogoLogo
4.1
4.1
  • Developer Documentation
  • Install HarperDB
    • On Linux
  • Getting Started
  • Full API Documentation
  • HarperDB Studio
    • Create an Account
    • Log In & Password Reset
    • Resources (Marketplace, Drivers, Tutorials, & Example Code)
    • Organizations
    • Instances
    • Query Instance Data
    • Manage Schemas / Browse Data
    • Manage Charts
    • Manage Clustering
    • Manage Instance Users
    • Manage Instance Roles
    • Manage Functions
    • Instance Metrics
    • Instance Configuration
    • Instance Example Code
    • Enable Mixed Content
  • HarperDB Cloud
    • IOPS Impact on Performance
    • Instance Size Hardware Specs
    • Alarms
    • Verizon 5G Wavelength
  • Security
    • JWT Authentication
    • Basic Authentication
    • Configuration
    • Users & Roles
  • Clustering
    • Requirements and Definitions
    • Creating A Cluster User
    • Naming A Node
    • Enabling Clustering
    • Establishing Routes
    • Subscription Overview
    • Managing Subscriptions
    • Things Worth Knowing
  • Custom Functions
    • Requirements and Definitions
    • Create a Project
    • Define Routes
    • Define Helpers
    • Host A Static Web UI
    • Using NPM and GIT
    • Custom Functions Operations
    • Restarting the Server
    • Debugging a Custom Function
    • Custom Functions Templates
    • Example Projects
  • Add-ons and SDKs
    • Google Data Studio
  • SQL Guide
    • SQL Features Matrix
    • Insert
    • Update
    • Delete
    • Select
    • Joins
    • SQL Date Functions
    • SQL Reserved Word
    • SQL Functions
    • SQL JSON Search
    • SQL Geospatial Functions
      • geoArea
      • geoLength
      • geoDifference
      • geoDistance
      • geoNear
      • geoContains
      • geoEqual
      • geoCrosses
      • geoConvert
  • HarperDB CLI
  • Configuration File
  • Logging
  • Transaction Logging
  • Audit Logging
  • Jobs
  • Upgrade a HarperDB Instance
  • Reference
    • Storage Algorithm
    • Dynamic Schema
    • Data Types
    • Content Types/Data Formats
    • HarperDB Headers
    • HarperDB Limits
  • Support
  • Release Notes
    • HarperDB Tucker (Version 4)
      • 4.1.0
      • 4.0.6
      • 4.0.5
      • 4.0.4
      • 4.0.3
      • 4.0.2
      • 4.0.1
      • 4.0.0
    • HarperDB Monkey (Version 3)
      • 3.3.0
      • 3.2.1
      • 3.2.0
      • 3.1.5
      • 3.1.4
      • 3.1.3
      • 3.1.2
      • 3.1.1
      • 3.1.0
      • 3.0.0
    • HarperDB Penny (Version 2)
      • 2.3.1
      • 2.3.0
      • 2.2.3
      • 2.2.2
      • 2.2.0
      • 2.1.1
    • HarperDB Alby (Version 1)
      • 1.3.1
      • 1.3.0
      • 1.2.0
      • 1.1.0
Powered by GitBook

© HarperDB. All Rights Reserved

On this page
Export as PDF
  1. Clustering

Establishing Routes

PreviousEnabling ClusteringNextSubscription Overview

Last updated 1 year ago

A route is a connection between two nodes. It is how the clustering network is established.

Routes do not need to cross connect all nodes in the cluster. You can select a leader node or a few leaders and all nodes connect to them, you can chain, etc… As long as there is one route connecting a node to the cluster all other nodes should be able to reach that node.

Using routes the clustering servers will create a mesh network between nodes. This mesh network ensures that if a node drops out all other nodes can still communicate with each other. That being said, we recommend designing your routing with failover in mind, this means not storing all your routes on one node but dispersing them throughout the network.

A simple route example is a two node topology, if Node1 adds a route to connect it to Node2, Node2 does not need to add a route to Node1. That one route configuration is all that’s needed to establish a bidirectional connection between the nodes.

A route consists of a port and a host.

port - the clustering port of the remote instance you are creating the connection with. This is going to be the clustering.hubServer.cluster.network.port in the HarperDB configuration on the node you are connecting with.

host - the host of the remote instance you are creating the connection with.This can be an IP address or a URL.

Routes are set in the harperdb-config.yaml file using the clustering.hubServer.cluster.network.routes element, which expects an object array, where each object has two properties, port and host.

clustering:
  hubServer:
    cluster:
      network:
        routes:
          - host: 3.62.184.22
            port: 9932
          - host: 3.735.184.8
            port: 9932

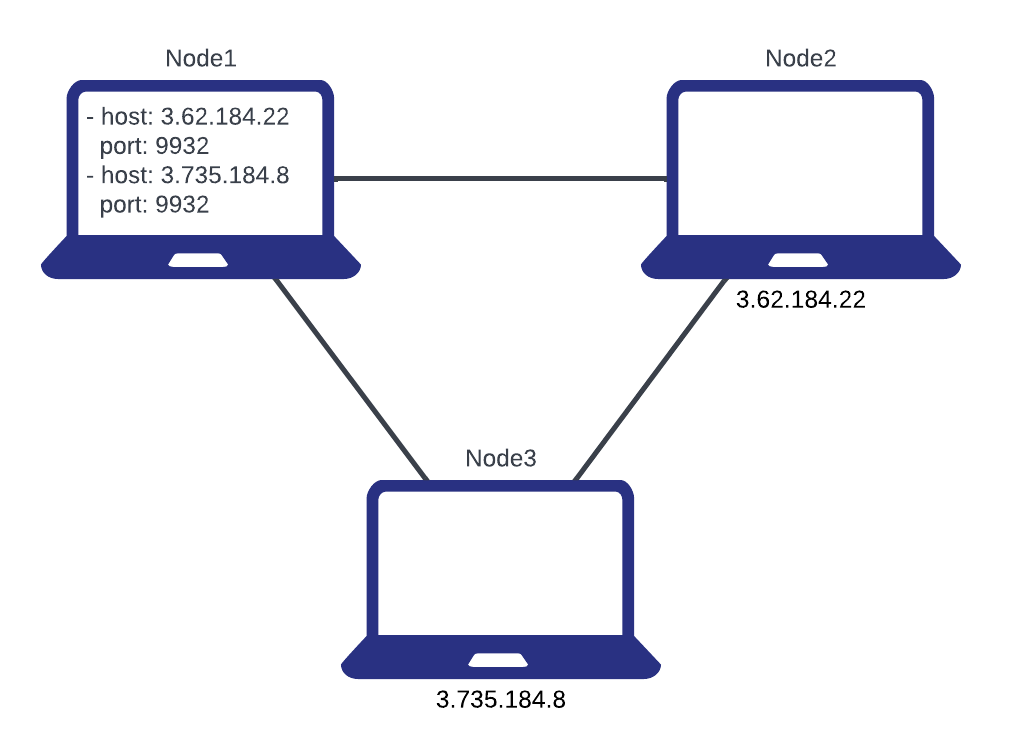
This diagram shows one way of using routes to connect a network of nodes. Node2 and Node3 do not reference any routes in their config. Node1 contains routes for Node2 and Node3, which is enough to establish a network between all three nodes.

There are multiple ways to set routes, they are:

  1. Directly editing the harperdb-config.yaml file (refer to code snippet above).

  2. Calling cluster_set_routes through the API.

{
    "operation": "cluster_set_routes",
    "server": "hub",
    "routes":[ {"host": "3.735.184.8", "port": 9932} ]
}

Note: When making any changes to HarperDB configuration HarperDB must be restarted for the changes to take effect.

  1. From the command line.

--CLUSTERING_HUBSERVER_CLUSTER_NETWORK_ROUTES "[{\"host\": \"3.735.184.8\", \"port\": 9932}]"
  1. Using environment variables.

CLUSTERING_HUBSERVER_CLUSTER_NETWORK_ROUTES=[{"host": "3.735.184.8", "port": 9932}]

The API also has cluster_get_routes for getting all routes in the config and cluster_delete_routes for deleting routes.

{
    "operation": "cluster_delete_routes",
    "routes":[ {"host": "3.735.184.8", "port": 9932} ]
}
figure 1